
How to Choose Vacuum Insulated Panels for Walls

Walls are quiet energy consumers. In a cold morning, heat slips through studs, joints, and poorly insulated corners before anyone notices. The 2023 Global Status Report for Buildings and Construction, published by UNEP and GlobalABC, estimated that buildings and construction accounted for 34% of global energy demand and 37% of energy- and process-related CO₂ emissions in 2022. Those figures make better wall insulation worth examining, but they do not make every product suitable for every project.

Vacuum Insulated Panels For Walls can provide high thermal resistance in a slim profile, which matters where window reveals, room space, or retrofit constraints limit thickness. Yet performance depends on more than the panel’s headline conductivity. Check its declared aged thermal value, dimensions, facing material, and tested fire performance. Then inspect the details: a punctured envelope, an uninsulated joint, or a poorly planned fixing can undermine the intended result. Small gaps matter.

IEA Executive Director Fatih Birol has described energy efficiency as “the first fuel”—a useful principle when weighing insulation choices. For a wall, compare whole-assembly performance, not just the panel. Ask how edges, fasteners, moisture control, and replacement will be handled. A panel may look excellent on a data sheet; the installed wall can tell a less tidy story. The right choice is the one that fits the building, the climate, and the installer’s ability to protect it. My caveat: product data alone cannot promise a good wall.
How to Choose Vacuum Insulated Panels for Walls

Assess Wall Climate, Assembly, and Required Thermal Performance

Choosing vacuum insulated panels (VIPs) for a wall starts with the local climate. In cold regions, the assembly must limit heat loss and manage indoor moisture. In hot, humid areas, solar gain and vapor movement may matter more. Check seasonal conditions, indoor humidity, and the wall’s drying direction before selecting a panel.

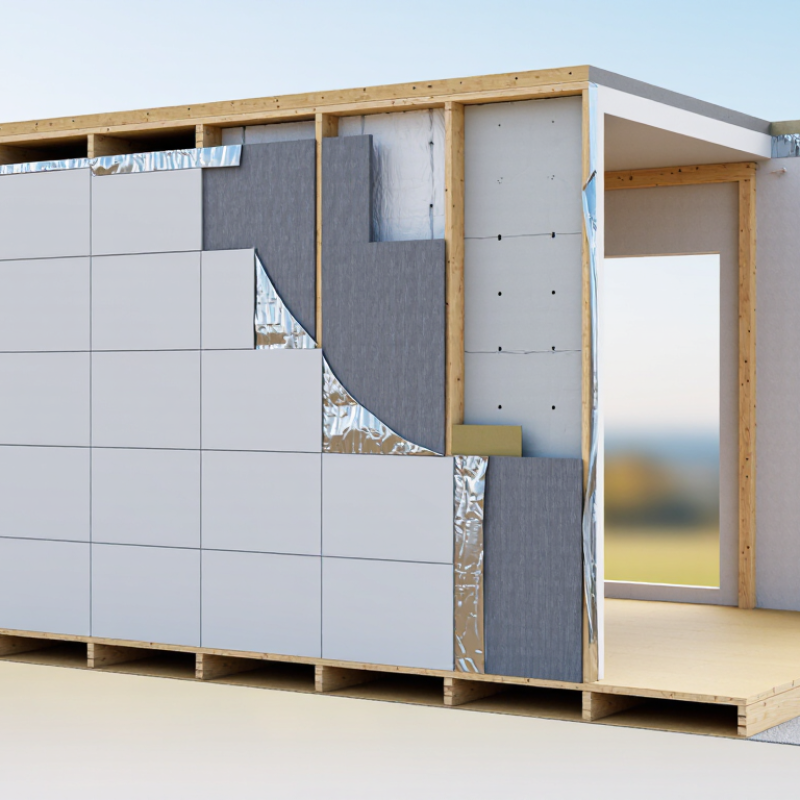
Then assess how the VIPs fit the full wall assembly. Cladding, drainage space, sheathing, framing, and interior finishes all affect performance. Compare the wall’s calculated thermal value, not just the panel’s center-of-panel rating. Panel joints, fasteners, and framing can create thermal bridges. Small gaps matter. VIPs can be damaged by cutting or puncturing, so confirm dimensions and installation details before ordering. No trimming.

Set a clear thermal target for the complete wall, then check whether the proposed assembly can meet it under real installation conditions. Ask for tested performance data and guidance on edge losses, moisture control, and attachment methods. A highly insulating panel may look ideal on paper, yet awkward joints or site constraints can reduce its benefit. I would review a wall mock-up where practical; plans rarely reveal every fit problem. That extra check can feel slow, but replacing damaged panels later is worse.

How to Choose Vacuum Insulated Panels for Walls - Assess Wall Climate, Assembly, and Required Thermal Performance

Assessment factor What to assess Selection guidance Wall-design implication
Climate and exposure Local heating and cooling conditions, wind-driven rain, solar exposure, and indoor humidity. Use the applicable local energy and building codes to establish the required whole-wall thermal performance. Check moisture risk for the specific climate and wall orientation. Climate alone does not determine panel thickness. The complete assembly must control heat flow, rain, air leakage, and condensation risk.
Required thermal performance Required wall U-factor or R-value, available wall depth, and the thermal contribution of framing, cladding, and other insulation. Compare declared, aged thermal performance at the intended thickness. Confirm whether published values describe the panel center or the complete installed assembly. Center-of-panel values do not include heat flow around panel edges, joints, fasteners, or framing. Evaluate whole-wall performance, not just the panel rating.
Thermal performance reference Panel thickness and declared thermal conductivity. For illustration, a 25 mm panel with a thermal conductivity of 0.004–0.008 W/(m·K) has a center-of-panel R-value of approximately 3.1–6.3 m²·K/W (about US R-18–36). This is a calculated center-of-panel range, not a guaranteed product rating or whole-wall value. Use the selected panel’s verified declaration and account for edge effects.
Wall assembly and panel layout Whether panels sit outside the sheathing, inside a service cavity, or in another protected layer; also assess wall dimensions and openings. Plan panel sizes, joints, corners, windows, and penetrations before installation. Use a layout that limits gaps and avoids unnecessary cuts. Vacuum insulated panels should not be cut, drilled, or punctured on site. Damage to the barrier envelope can reduce insulation performance.
Thermal bridges and fixings Panel joints, perimeter details, studs, brackets, and fasteners that pass through or around the insulation layer. Coordinate joint placement and support details with the wall design. Use compatible fixing methods and include repeating and linear thermal bridges in calculations. Small gaps or conductive connections can reduce installed performance relative to the panel’s center-of-panel rating.
Moisture, durability, and protection Drying potential, vapor-control layers, water-management details, construction exposure, and protection from impact or puncture. Review condensation risk for the full assembly and protect panels from damage during transport and installation. Follow applicable fire and cladding requirements. The panel’s barrier envelope is highly resistant to vapor transmission; the surrounding wall still needs a climate-appropriate moisture-management strategy.

Compare VIP Core Conductivity: Typically 0.004–0.008 W/m·K

Vacuum insulated panels (VIPs) can deliver strong insulation in thin wall assemblies, but core conductivity is only part of the decision. Reported values commonly fall between 0.004 and 0.008 W/m·K. Baetens and colleagues’ review in Energy and Buildings (2010) discusses this range and explains why performance depends on panel design and condition.

The number usually describes the panel’s central area, not the whole wall. Seams, fixings, and panel edges create thermal bridges. Edges still leak. An IEA/ECBCS Annex 39 report on high-performance insulation systems also highlights the importance of accounting for joints and ageing when assessing VIPs. That gap matters: a wall with many small panels may perform differently from a simple centre-panel figure.

Compare test conditions and ask whether the quoted value is initial or aged conductivity. Check panel thickness, edge construction, and the proposed joint layout against the wall detail. A neat datasheet cannot predict every installation. I would treat the 0.004–0.008 range as a screening guide, not a guaranteed whole-wall result; site cuts or punctures can compromise a panel, so the design should avoid trimming VIPs on site.

Match Panel Thickness to Space: Common Options Range from 10–50 mm

Vacuum insulated panels can provide strong thermal resistance in a slim wall build-up, but thickness should match both the available space and the project’s insulation target. Common options range from 10 to 50 mm. A 10 mm panel may suit a tight reveal or a small retrofit area, while thicker panels can offer greater resistance where the wall can accommodate them. Thickness alone is not a performance rating. Check the panel’s declared thermal data and the values used for long-term design.

Measure around window frames, corners, sockets, and uneven surfaces before choosing a size. A 50 mm panel may improve insulation, yet it can push trim outward or reduce usable room space. There’s a catch: VIPs generally cannot be cut on site without damaging their vacuum seal. Accurate layouts matter. Ask how joints, edges, and penetrations will be handled, since gaps can weaken the overall wall performance even when the panels themselves perform well.

The awkward part is that the thinnest option can look ideal on a drawing, then prove difficult to detail around a real window. Compare thickness against the complete wall assembly, not just the panel. Request tested thermal figures, installation guidance, and clear advice on replacement if a panel is damaged. A little extra planning helps avoid costly surprises.

Calculate Whole-Wall R-Value, Including Joints and Edge Thermal Bridges

Vacuum insulated panels can deliver high resistance in thin wall build-ups, but the label value is not the wall value. Baetens and colleagues’ 2010 review in Energy and Buildings reports VIP core thermal conductivities around 0.004–0.008 W/(m·K). At 20 mm thickness and 0.006 W/(m·K), the panel centre alone gives roughly R-3.3 m²·K/W, before facings, joints, or framing. Edges matter. A narrow gap filled with ordinary insulation can still create a measurable heat-flow path.

Calculate the assembly, not just the panel. Use Uwall = Σ(fᵢUᵢ) + Σ(ψⱼLⱼ)/A + Σ(χₖ)/A, then convert to Rwall = 1/Uwall. Here, f represents area fractions, ψ is linear edge or joint transmittance, and χ accounts for point bridges such as fasteners. Measure the actual panel layout: a 2.4-metre wall with repeated panels has far more joint length than one uninterrupted panel. ISO 10211 provides methods for numerical thermal-bridge calculations; use tested or modelled ψ-values for the specific details. A simplified estimate is useful, but it can flatter the result. Check corners, window reveals, and panel terminations, where site cuts or small alignment errors may change the effective value.

Check Fire Rating, Moisture Protection, Installation Limits, and Service Life

Choosing vacuum insulated panels for walls starts with the full wall assembly, not just the advertised R-value. Check the fire classification and the test conditions behind it. A panel’s facing, joints, and nearby materials can affect how the assembly performs. Ask for documentation that matches the product and proposed wall detail. Fire performance matters.

Moisture protection deserves equal attention. Inspect how the panel edges are sealed and how the design handles condensation, rain exposure, and air leakage. A small puncture can reduce insulation performance, so plan electrical boxes and fasteners before installation. Panels usually cannot be cut on site. That limit can make awkward corners and narrow spaces harder to finish than expected. Review shop drawings with the installer.

Service life depends on keeping the barrier intact and choosing panels suited to the building’s conditions. Ask for aging data, storage instructions, and warranty terms, but do not treat a warranty as a lifespan guarantee. Check whether repairs or replacement are practical if a panel gets damaged later. Photographing panel labels and concealed wall details can help future maintenance. I would not assume every site detail is solved by the product sheet; some questions only appear once the framing is visible.

Contact Us
